Showing posts with label Christmas. Show all posts

MWL DT: LO | Joy

Hello fellow crafters! Today I am sharing a layout on Made With Love with some chain stitching!


Stitching on layouts are one of my favorite things to do. They always inspire the outcome of the entire layout.


This time, I was inspired to stitch a Christmas tree geometric image with chain stitches. I have always wanted a Christmas tree for Christmas. Singapore homes are just too small to house a tree! But I always loved seeing the different decorated Christmas trees online or while visiting my friends' place.

Chain stitching are the basics of book binding. I like to use them on layouts! For this Christmas tree, I started with measuring the distances, and piercing the points for sewing purposes. The stitching was so therapeutic! This time, I am using the Mayaroad waxed hemp. I like that it gives a more solid feel, and the Christmas tree looks real!


After the stitching was done, I started layering the photo and added sticker embellishments. Since I am layering these embellishments, I used the powder tool so that the sticker elements won't stick to the wrong places.


Behind the photo, I decided to use some water color to spice up the layout. Using the Gamsai Tambi is a breeze. Just spritz some water to the color palette you intend to use and brush it onto the cardstock. Then, I added some light number stamping in Versafine Grey. Let it dry or use a heat gun to speed up the drying process. Afterwards, decorating is like the sentiment "oh, what fun!"


To finish up the layout, I used the Sizzix die and cut out the letters J, O and Y. Large alphabet diecuts are my favorite! They are prominent on a layout! Add some embellishments and sentiments around the title to create interest.


I had fun with this layout, and hope you enjoyed the walk through! All products used are from Made With Love, thanks for dropping by my blog today! 

Supplies Used:

  • Gamsai Tambi Water Color
  • Mayaroad Waxed Hemp - Yellow and Green
  • Simple Stories | Oh What Fun! Collection - Combo Cardstock Stickers
  • My Mind's Eye | Oh What Fun! Collection - Wreaths
  • My Mind's Eye | Oh What Fun! Collection - Santa
  • My Mind's Eye | Oh What Fun! Collection - Wonderland
  • My Mind's Eye | Oh What Fun! Collection - Minty
  • Sizzix Bigz Alphabet Set 7 Dies - Serif Essentials
  • Sizzix Bigz Die - Stars


MR DT: Album | Joy

Hello! End of the year means joy to me as I start to prepare some gifts for my dearest family and friends! This is also the time I start humming Christmas Carols while I work on my projects ha!
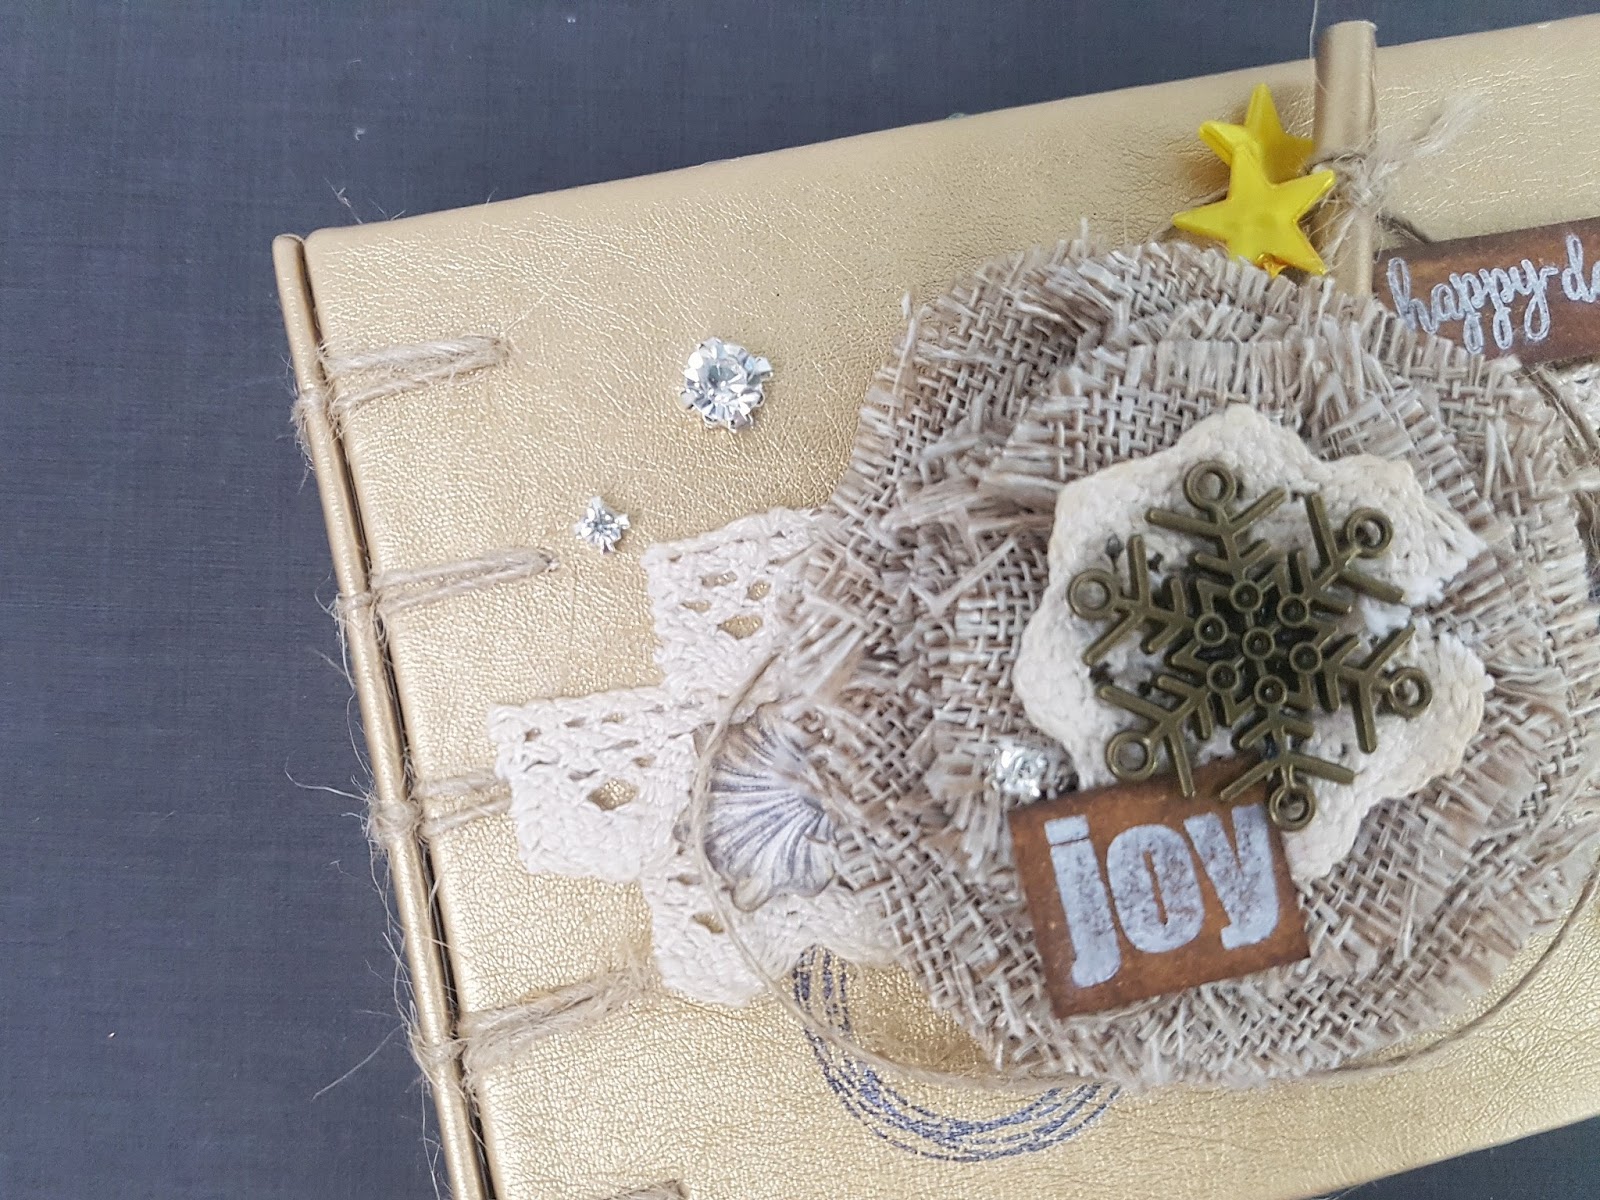
Today I am up on Mayaroad, and would like to share a mini album of Joy, having a dear friend in mind. She has kept almost every vintage Christmas postcards and photographs, a collection she loves dearly. I thought it would be nice to make an album for her.


This album is covered with leather, then hand bounded together with secret belgium binding. This mode of binding is my favorite, because it can look vintage or fun loving depending on the thread you use. This time, I am using the jute craft string as the main element in this project. Gotta love this roll of jute craft string, I have to add some of these to almost all my projects!


The main focus on the album cover was the jewel center burlap blossom. I really liked this flower piece, it is grunge and elegant all at the same time! The only difference was that I used a plier to remove the jewel centre, so I could use them seperately as a splatter around my centerpiece.


I have used the KO vintage trims on this album. Since it was too white to my liking, I decided to add some coffee stains to it. It is really easy, just add coffee powder (no instant coffee mix, just plain grinded coffee beans) to water. Soak the trim until the color appeals to you.


I added the trims to the background in rows of different lengths, and also to the center of the burlap blossom. Just run a running stitch at the straight ends of the trim, and then tighten to form a rosette trim. To top it up, I added a snowflake metal charm. To add a title to the album, I started out with distressing on the remains of the shipping tags I had used previously. Then I stamped the word Joy and happy days with silver ink pad. These words are from the Homemade Holidays stamp set. Just for fun, I added a scroll tied together with the jute craft string and accompanied by the gold star pins.


For the pages I kept it simple yet with a little fun! These pull out tags creates interest for the receiver. I used the Manila shipping tags as a base, distressed with shades of brown for contrast. You can use these tags too! On a few pieces, I stamped the snowflakes  from the Homemade Holidays stamp set randomly on the tag. I have also added some jute craft strings here and there, and at the top of the shipping tag.


When slided, the shipping tag raises and disclose the photo that is behind it. I like this element of surprise for the receiver! At the base of the shipping tag, I have also added the coffee dyed trim and a row of the pearl center trim.


Here is how the slider mechanism looks like!

Hope you get inspired for Christmas projects with Mayaroad products!


Visit Mayaroad for more inspirations!


MR DT: Mini Album | December Christmas

Hello! This week, our designers on Maya Road blog are pairing with Photoplay to share some inspirations! 


I was very excited and inspired when I received the gorgeous Mad 4 Plaid Christmas collection from Photoplay. I knew I had to get ready for the upcoming Christmas (it is just 4 months away!) 

Therefore I started with a mini album, which opens up to a Starburst effect. One of my favorite is the homemade holidays stamp set. I used it to emboss some snowflakes onto the pattern paper. Other embellishments include the merry christmas diecutFanciful Wish diecutSilver Snow Crystal Charms and Crystal Circle Buttons.


On the inside of the album, I decorated it with red Rick Rack trims, and Christmas die cuts. Here I used the merry christmas steel die.


The album can be opened up fully displaying a starburst effect. I used the gold bulldog clips to secure the ends. Just to add some flair, I have also added the Vintage Crafting Tassels - Fire Red and snowflake charm, held by the mini safety pins.


But I got carried away and made another 2 more albums! I made these slightly smaller than each other.


Each of these mini albums are binded with coptic stitch using Ken Oliver waxed hemp threads.


The albums fan open to a star shaped manner.


Now with these 3 albums I am ready to build my very own Christmas tree! I intend to place a photo each day as I start the countdown towards Christmas, I think it would be fun! 


Hope you are enjoying the inspiration so far. 

To celebrate this blog hop, we are excited to be giving away a $20 coupon to the Maya Road online store! One winner for the prizes will be chosen from entries on all of the blog posts here on the Maya Road Blog about the swap. Winner will be announced here on the blog next week. So stop by and comment each day for a chance to win! Be sure to also stop by Photoplay and social media for lots of inspiration as well! (Be sure to first check out here and you can hop from there on.) 

This same month, use code KOlove to enjoy 30% off Ken Oliver Charms too!


This month is surely a fun filled month, thanks for checking out the blog today. Don't forget to drop by Maya Road blog tomorrow again! 


MWL DT: Mini Album | 12 Days of Christmas

Try not to be alarmed by the title, yes it is only August, and 4 months away from my favorite season! I always like to make my minis a little earlier for the season, so when time comes, I just have to stick the photos and do my journalling. 

Today I am on the Made With Love design team, sharing a Christmas album I have prepared for this year. Christmas is always my favorite festive season, because it is filled with lots of love and joyous cheers!

12 Days Of Christmas

12 Days Of Christmas - Front Cover closeups

I couldn't help but to do some fussy cutting for the front cover. The little figures in the pattern paper (supplies below) are just too adorable! Decorations on this album are inspired by the pattern papers. These beautiful papers are by Pebbles - Merry Merry Collection. 

12 Days of Christmas - Sunburst

There are a total of 12 tags in this sunburst album. I made it 12, so it can house 1 picture each on my 12 days of Christmas. I wanted to document my 12 days with a photo of the day. Well 12 tags also corresponds to a sheet of 3x4 grid pattern paper! Since I love them so much, might as well use them all right?

Sunburst, tags close up

Here is the tag close up. I left some white matting on the tag, so I can just paste my photos in afterwards. The white mat also helps to highlight the photos! Then I did some more snipping. Randomly cutting out the florals in one of the pattern paper and used them as tag headers! Not only are they asthetically pretty, they function as a holder so I can pick out my tags easily from the pockets. 

Now don't forget to add some fillers! I used the Tim Holtz punch to punch out some leaves so I can stuff them in between the flowers or behind them. You will be surprised at how these little things add dimensions and layers to your project!

Piano Hinge Binding

How could I not have any binding for my albums? You can say that is almost impossible for me. So yes, I am making use of the piano hinge binding this time. The red and green combination has me wishing for Christmas to come soon! Top it up with weaving to complete the entire look. 

Oh yes, straws are used here. Don't worry, these are absolutely clean ones, used for scrapbooking purposes! I like these straws because they are sturdier than the usual ones, and they come in multiple colors! These straws are by Doodlebug Pixies - ladybug. 

All materials used for this project are available at Made With Love. 
Supplies:
• Pebbles - Merry Merry Collection
• Doodlebug Pixies - Ladybug (straws)
• Tim Holtz Punch - Pine
• Kaisercraft Decorative Block Words Dies
• Sizzix Thinlits - Gatefold Card, Birthday (bracket die for covers)
• AC white cardstock
• Red Twine
• Green Dotted Cardstock (fillers)

Want to learn how to do this? This month, I am conducting a similar workshop teaching how to construct a sunburst album with piano hinge binding. Don't forget to look out for more book binding projects / classes available only with Made With Love

Thank you for dropping by my blog today! 

MR DT: Christmas Cards

Hi Roadies! What is in your crafting plate today? For me, it had been a good change. A little slowing down and spending time on the things I love. This morning, the sun is up and shining. Love to wake up to such bright mornings and it makes me fresh. 

Christmas is coming too soon! I try to get ahead of time and start on the Christmas cards early, so I don't get into the mad rush. Here, I am sharing 4 cards which I have done up pretty quickly with the help of Maya Road embellishments (Really, all you need for Christmas cards this year is Maya Road)


For the first card, I made use of the Maya Road Homemade Holidays stamp set as my primary 'ingredient'. It is so easy to use this set! You have all you need!  I first stamped the circular bells with a random color, red or green. Then I matched it with the hanger portion and stamped. (This hanger portion is also available in the stamp set!) Before I laid all my bells onto the card base, i added some more stamping (the circles with dotted lines) in the background to highlight the bells. Then I stamped the sentiment directly onto the card base using some red pigment inks. Set it all up, and add some Cherry Red cording. When all is done, I decided to add some more blink to this card with the Silver Snow Crystal Charms!


For the next card, i decided to showcase one of my favourite flowers in the Maya Road Collection. This is the Cadmium Red Shimmering Pointed Petal Flower. Love its vibrance and how it shines! There is no need for any other embellishments with this flower! In my case, i added the alphabets 'J' and 'Y' to make up the word JOY. Then I added a little banner, stamped a tiny phrase from the Homemade Holidays Stamp Set


Another card here with the same word Joy. This time my stamped sentiment has changed. One stamp set and it gives me this many possibilities. Instead of a large flower centre, I have used the Wood Snowflake button. For the background, I had distressed it with some darker blue distress inks to provide a contrast against my title.


And don't forget to use your dies as well! Dies are very important tools to my crafting purposes nowadays, and I can't do without them! Here is the So Deer Steel Die on some shiny dual tone foil paper that I had on hand. On the background, I did some random stamping of snowflakes. Even the dotted line edging the sides of my background is from the stamp set.

Totally loving the journey working through these 4 cards!


Here are some of the products used:


For those residing in Singapore, Maya Road products are available in Made With Love.

Visit Maya Road for more inspirations!

MWL Big Shot Party - Christmas Bendi Card


I can't wait for Christmas! For October big shot party, I am using some fabulous Sizzix dies to create this 3D Bendi Card! Oh how I love creating 3D scenes. Especially Christmas ones. With the new Sizzix dies, creating scenes are so easy!


This card is super special! It can be folded flat for posting, yet at the same time, it can be fixed with 2 bends to showcase a 3D card! When I make cards, I like to build something within it to make it look a little more special.


All class schedules are available on Made With Love FB page and in our store at 313Somerset. Don't miss out~ !

Thanks for dropping by my blog today! 


Maya Road: CHA2016

With CHA2016 just over, I would like to reminisce the projects and new additions for this year. CHA has always been a big craft event for paper crafters all over the world, and this year, I am excited to be in the midst of this huge event *remotely* Ha!

I am in love, all over again and again, and especially with the new products from Maya Road. Amazing products! I am so lucky to be designing for Maya Road where the products are always staple in my scrapbooking needs! 

This year, I have been super pampered by Maya Road with their new products and made some projects for CHA showcase. With so many goodies, I was not even sure where to start with! This journey is bringing me to places I have never expected and I am enjoying this journey so much!

1. Maya Road CHA2016 Projects
Credits: Maya Road
Showcasing some of the lovely projects at CHA2016!
Maya Road CHA2016 Projects!
Roadies, check out some of our fun projects (this time in high res) in our booth! We hope you love the samples as much as we do! #CHA2016
Posted by Maya Road on Sunday, January 10, 2016

2. Maya Road CHA2016 - Double Star Stitched Album
I love to stitch, this fact is not much of a secret actually. For my MR CHA2016 projects, I have stitched up 2 albums and 1 wreath.

The first album - I decided to make a chunky album with a double star stitch which I have came up with. I enjoy the depth of album to incorporate more pop ups in each page, as well as more MR elements to showcase the photos. I love how easy it is to make an album each time with Maya Road Chipboard Albums, it is one of the items which I cannot do without! 

I love the double star stitching on this album. There are total of 8 double stars forming up the spine of the album. The resin centers help to divide the 8 double stars and add focus to the spine. I have also used MR glitter tape - diamond for the construction of the album spine.


2. Maya Road CHA2016 - Star Stitched Album
For this second one, I have incorporated Double Coptic Binding and Altered Star Hemp Leaf Binding in one project.


There is always so much room to decorate your pages with Maya Road chipboards / wood embellishments! I find it easy to change the color or add pattern paper to the embellishments to suit the theme.


3. Maya Road CHA2016 - Christmas Wreath
This is probably my first try with Wreaths, and boy did i have fun with it! Coiling the sewing rack with red cord is really therapeutic and fun! Here I have used the star, feather, Merry and Christmas die-cuts. (did you see the feather diecut below? *squeals*) Another new product that is really pretty is the shimmering pointed petals flower - they come in many colors and you can be sure to find many uses for it!


Although I am not there in person this year, I have consolidated some of my favorites! Viewing through all the pictures of CHA2016, I am so tempted to be there next year! :)


1. Maya Road Booth
Credits: Maya Road
Oh my gosh, look at all the goodies! 
Roadies, check out a quick peek at our booth. Come see us at 2406 for lots of fun products, make and takes and demos.
Posted by Maya Road on Friday, January 8, 2016
2. We love MR!
Credits: Julia Stainton
Oh yes! We love MR!


3. Maya Road Steel Dies
Credits: Julia Stainton
How can one not love these dies? I am in love with every single one of them! They are sturdy and cut materials very well. All of these dies are staples for our scrapbook or planner needs. Personally, it's also in my favorite color - teal!


4. Tassels
Credits: Julia Stainton
Must have! I love the array of colors available!


5. Wood Tokens
Credits: Julia Stainton
As you would have seen some of these on my CHA2016 projects, I feel that this is a must have!


With so many new and exciting products coming up along the way, this year is going to be full of inspirations and creations! Can't wait to see what the other MR Designers have in place as well! Need some ideas? Dont forget to check out MR FB page and MR DT blog for more inspirations!