Showing posts with label #doraecyscraps. Show all posts

Sizzix: LO | 2 of Us

There is something special when I work on layouts. Different photos require different themes and ideas, and I always learn a thing or 2 about the way I craft. Despite being a crafter for over 10 years now, I constantly get new ideas and learn more things along this crafty journey.

Today I sat down with my Sizzix dies and photographs. Suddenly it dwelled onto me to build a layout with different structures in grid mode using mainly cardstock. I know most of us always pick out some pretty pattern papers when it comes to crafting, but what if I did it without pattern paper? Here is the layout I came up with! 


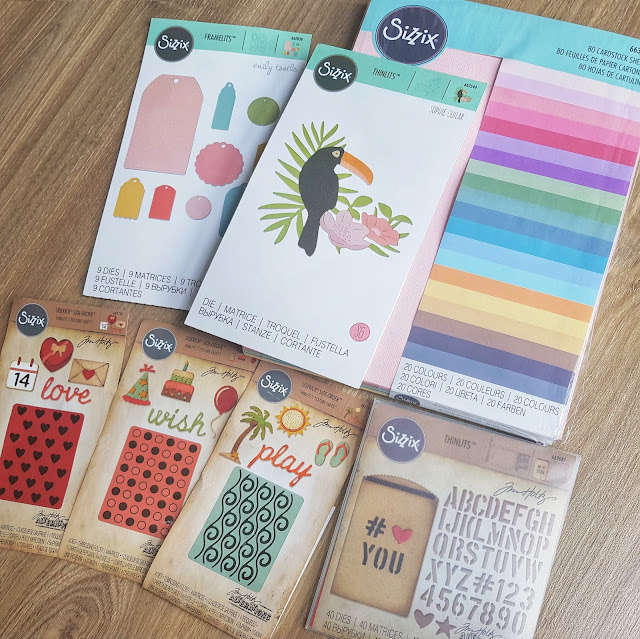
Cardstocks are also a beauty to play with, and I thank Sizzix for a great pack of cardstock sheets! 20 yummy colors to choose from, useful for any occasions! Alongside, I chose to use an array of dies. These dies can't go wrong!


I like playing with embossing folders, especially on layouts. They create textures, and visually appeals to me. Here I have used the Sidekick Side-order sets - Beach, Valentine and Birthday. I created different cards and aligned them in a grid manner on the layout. To add shadows and dimension to the embossing, I used some distress inks to highlight the embossed portions.


Then, I used the Sizzix Framelits Die Set - Tags to randomly add a different shape all around the layout. I don't really want the layout to look so square, so I chose to use these tags. To add even more dimensions, I did some random stitching on the tags as well. 


Next up, I decided to add a pocket to this layout so I can do some secret journaling for the husband ha! To do this, I used the Sizzix Gift Card Bag die, and titled it #we. This is like using the negative of the diecut, and you can use the positive diecut for some other project as well. I used the biggest tags to fill up the pocket, and another smaller tag to hold it in place. Just add brads to hold the tags together. On the larger tag, I added a photo on the front and my journaling to the back.


To further reduce rigid edges, I used the Tropical Bird die to highlight some of the featured portions of the layout. I have also cut out the flowers and used it as decoration randomly. 


It was fun coming up with this layout, it was like an architecture slowly transforming and appearing before my eyes. Hope you enjoyed it too! 

Do check out the Sizzix UK blog and instagram for more ideas! While you are at IG, also check out #mymakingstory for even more inspirations! 


Sizzix Supplies Used:
1. Sizzix multi tool 

12 x 12 Layout | When Life Gives You Lemons

Hello! I am back with another layout using Pink Paislee Paige Evans - Pick Me Up Collection! I always love to use up whatever I started on. This collection was easy with so many beautiful designs on the paper!

If you missed out on the previous layouts done using the same collection, here are the links:
- My Amazing Hero
- LOL


The splash of colors really makes me happy! This layout was done with some motivational value in mind, and a reminder of my father's famous words. Recently, life had given me some lemons, and that reminded me of what my father always told us. It was what I hung onto during the rough rides, and it always helped me through bad times.


American Crafts is really pampering us with lots of goodies to craft. I love to mix the  types of alphas when it comes to long titles! Different styles and patterns make me super happy!


My favorite method of documentation and journaling - type it out! Here you can see that I had also machine stitched all the individual square pieces of pattern paper. Stitching on layouts gives them a different texture and look - no layout will ever look the same!

Geometric shaped papers are my favorite to use, I guess they fill up that engineer mindset of mine and everything lays out nicely! Geometric designs and like building blocks to me, so working with them is like working with tessellations. (Mathematics is still one of my best friends!)

Hope you enjoyed the walk through! Till the next one!

Supplies Used:

  • Pink Paislee Paige Evans - Pick Me Up Collection
  • WRMK Typecast
  • AC thickers


MWL DT: LO | Singapore

Hello! I am back, posting as Made With Love DT today!

This time, I am sharing a layout done with Singapore as the theme. Afterall, National Day is coming right up, and amidst the celebrations, I wanted to do something for this special day!

I am proud to be a fellow Singaporean. No, it is not perfect, but Singapore has provided me and my family a safe place to live in. It has given me stability which I yearn for and a place I can call home. Being a regional engineer for most years of my working life, I have experienced many outstation visits, where life was hard and many systems not in place. It always made me appreciate home very much and never take anything for granted.

These 2 very beautiful drone photos (amongst the many beautiful shots) were taken by a very good and talented friend of mine. Eugene has taken so many nice shots of Singapore, inspiring me to get this layout done! Thank you Eugene for lending me these photos!


I started doing up this layout with 3 important parts - a flag, Vanda Miss Joaquim and of course the crescent and stars. These signifies our country very much, and I wanted to have these signatures in my layout.

For the flag, I die cut the Sizzix Bigz Die- Mosaic #661194 multiple times (4x4 format). Then I grabbed some white cardstock and embossed them with the Sizzix 3D Embossing Folder - Botanical #662716. If you have not tried the 3D embossing folders yet, you should! They give such delicate and pop up details! Our flag comprises of the red and white elements, so for the top half, I used a red pattern paper as the backdrop.


Vanda Miss Joaquim was all fun to play with! I must say that I felt really "allergic" to the color purple ha! However our Vanda Miss Joaquim does really deserve to be colored in the correct tone. I used Distress Makers and a thin paint brush for this. Check out this helpful Sizzix video on how you can make your own orchids for your layouts or craft projects! Instead of using the same dies as mentioned in the video, I chose to use the Sizzix Bigz w/ textured impressions Butterfly Embellishments #662442. They work the same wonders, have fun experimenting!


The crescent was cut using 2 circle dies of different size. The framelits are my most used dies. Basics are so important to any die-cutters - got to have some in your collection! To further enhance the white foil crescent, I ran it through with a swirl embossing folder. Textures are important for me on my layouts. One way to add texture is having embossed images. For the stars, I used the Sizzix Bigz Die - Stars #656339.

I have a few of the Alphabet XL dies in my collection, and I truely appreciate the ease of use for them. Today I am using the Sizzix Bigz XL Alphabet die - Typo in Upper Case #661198.

For the subtitle, I decided on a smaller font. I love this set - Sizzix Thinlits Holiday Block Words #660057 - the alphabets cut out individually, so you can always mix and match whatever titles you want! I use my xyron sticker machine to add adhesives to these small letters, and then adhere it onto a strip of cardstock. This helps me plan where I want to place the subtitles easily, instead of moving the small little pieces!

Have a great week ahead leading up to National Day! (P/S: We all look forward to that public holiday don't we? *wink*)

Materials used are available at Made With Love.
Made With Love
B2-08, 313 Somerset, Orchard Road
Tel : 67337630
Facebook |  Instagram

Supplies Used:
• Sizzix Bigz Die- Mosaic #661194
• Sizzix 3D Embossing Folder - Botanical #662716
• Sizzix Bigz w/ textured impressions Butterfly Embellishments #662442
• Sizzix Bigz Die - Stars #656339
• Sizzix Bigz XL Alphabet die - Typo in Upper Case #661198
• Sizzix Thinlits Holiday Block Words #660057
• Xyron 1.5" Sticker Maker

12x12 Layout | My Amazing Hero

Hello dear crafty folks! Soon it will be July, and we will all approach the second half of 2018, how fast does time flies!

A while ago, I have shared a Father's Day layout as Made with Love DT, and I had some papers left over, so I thought I would make another layout (or 2 or 3. you will see.)


This is the layout I came up with, using the papers leftover from the Pink Paislee Paige Evans - Pick Me Up Collection. I think you really might see another layout really soon. After all, I can't be biased and just post layouts of my dad all the time right? *grins*


Fun stuffs really happen when my dad is in the house. I find him very cool, doing things people his age generally do not. Then again, my dad's surname is Koo so how can he not be cool? (Silly joke with my surname because it rhymes *LOL*) He is always so obliging, no matter how odd it might be. This photo was actually part of a video, and in that video, we were asking my Dad to hang on to the bars and hold still for that few seconds.


I also did some random grid stitching, just weaving straight dotted lines in the midst of the embellishments. I wanted some irregular texture to the rigid grid layout I was doing.


I am not a fan of writing on layouts. Usually I whip out one of my typewriters and type a message. This one I did it on the pattern paper before attaching to the layout. Honestly, my memory is quite bad. Even though this was taken in Taiwan in March, I had already forgotten about the date or place. I had to go through my gallery of photos and view the date and place it was taken. If you really don't have anything to say, just a date and location will do wonders when you flip through your album 10 years later.

Hope you get inspired, get your materials and some thread, layouts are that easy to make (and enjoy!!)

Materials used are available at Made With Love.
Made With Love
B2-08, 313 Somerset, Orchard Road
Tel : 67337630
Facebook |  Instagram

Supplies Used:
Pink Paislee - Paige Evans -
Pick Me Up Collection
WRMK Typecast


MR DT: Cards | Celebrate and Thanks

Hello roadies! I am on the Mayaroad blog today with 2 cards to share. These 2 cards are inspired by this gorgeous Mayaroad die - Geometric Hexagon Die. 2 cards with 1 die - how awesome is this die!

Here is the first of the cards, using the positive die-cut. I cut several pieces of the die-cut with white cardstock and arranged them in a geometric fashion.


Each of these hexagons are actually a layer of 2 pieces of die-cuts to enhance the texture of the background. Since I was going to be using white on white cardstock, I needed the background to have some form of texture.

Then I added the silver foil die-cut on top of the existing white cardstock die-cut. The silver foil star came from the die-cut, I just cut along the edges so the background does not look so plain. 

To complete the card, I added some wood shaped star buttons and a sentiment from one of my favorite stamp set, Rose Garden Sentiments using silver ink on black cardstock for contrast. Finally, I added some printed vellum sheet and attached the card front to the base with adhesive foam. 


This really excites me, especially when 1 idea leads to another. Before I know it, 2 cards are done with 1 same die.

This card was lovely to make. While making this first card, I found a second idea to use up the negative of the same die. Instead of throwing them to the bin, I decided to work with them, and here is what I achieved.


For this card, I picked up my distress ink and colored the background piece in peacock feathers color. Then I added some temporary adhesive to the postive side of the die-cut, and stuck it on the card base. Then I went ahead and pasted the negative portions with permanent adhesive. Once that was done, I removed the positive piece, arranged it next in place and repeat the same process again. 


Here was what it looked like after I was done. Then I went ahead to trim off the sides and matted it with teal cardstock.


I really loved how the shades of teal contrast with the white negative die-cuts.


For the decoration, I added some die-cuts from the floral die set. The florals act as a base for the wood tokens. I matched 2 different wood tokens layered one on top of the other and added some leaves acting as fillers and contrast from the base. The die-cut leaves are from the same floral die set and the stamped leaves are from Rose Garden Sentiments. To complete this card, I added some frosted transparency and banners peeking out from either side of the decoration.


Hope you get inspired with Mayaroad, have a great week ahead!

Mayaroad Supplies Used: