Showing posts with label layout. Show all posts

12 x 12 Layout | When Life Gives You Lemons

Hello! I am back with another layout using Pink Paislee Paige Evans - Pick Me Up Collection! I always love to use up whatever I started on. This collection was easy with so many beautiful designs on the paper!

If you missed out on the previous layouts done using the same collection, here are the links:
- My Amazing Hero
- LOL


The splash of colors really makes me happy! This layout was done with some motivational value in mind, and a reminder of my father's famous words. Recently, life had given me some lemons, and that reminded me of what my father always told us. It was what I hung onto during the rough rides, and it always helped me through bad times.


American Crafts is really pampering us with lots of goodies to craft. I love to mix the  types of alphas when it comes to long titles! Different styles and patterns make me super happy!


My favorite method of documentation and journaling - type it out! Here you can see that I had also machine stitched all the individual square pieces of pattern paper. Stitching on layouts gives them a different texture and look - no layout will ever look the same!

Geometric shaped papers are my favorite to use, I guess they fill up that engineer mindset of mine and everything lays out nicely! Geometric designs and like building blocks to me, so working with them is like working with tessellations. (Mathematics is still one of my best friends!)

Hope you enjoyed the walk through! Till the next one!

Supplies Used:

  • Pink Paislee Paige Evans - Pick Me Up Collection
  • WRMK Typecast
  • AC thickers


MWL DT: LO | LOL

Hello hello! I am posting as Made With Love DT today, sharing a stitched layout this time. It was Father's day yesterday, so today's post is really dedicated to my hero. Happy Father's Day, daddy! You are always my hero and first love *kisses*


When I started out this layout, I knew I wanted it to be in a geometrics theme. My dad is an engineer, he is also the one who had inspired me to be one. So when I laid eyes on Paige Evans' Pink Paislee Pick Me Up collection, I immediately got inspired by one of the papers.
Pink Paislee - Paige Evans - Pick Me Up Collection

What do you see from this paper? I literally saw diamonds jumping at me! So I took out my trusty scissors and immediately cut those shapes up, knowing they would well fit onto my layout. In addition, I did have them matted onto another pattern paper in the same collection just to give it a boost of contrast on the layout.


Oh, but I really had to add some more texture to the entire layout. Of course there had to be stitching! I decided to use another geometric design as the background, hence deciding to fill it up with a hexagonal/diamond pattern. Adding stitches adds a whole new dimension of texture and outlook to the entire layout, so I really love to add these stitches to my layouts.


Journal on your layouts! This is such an important part of layouts, but most commonly neglected. Most are afraid to write, but documenting memories really means recording the thoughts of the photo or layout. I use my trusted WRMK typecast for my journal purposes. It can take in 12" papers, and that is one big bonus for scrappers! In this case, I chose to cut them out in strips and adhered them with adhesive foam.


The title meant a lot to me. While acronyms are part of our lives, my father is trying to decipher the acronyms that commonly arise during our Whatsapp conversations. While the official meaning of LOL is "laugh out loud", my father really thinks otherwise. On one occasion, he asked what is the meaning of LOL, and he thought it was "lots of love"! Creative for sure! That is how LOL got its new definition and definitely something special between my dad and I.

To create the alphabets, I turned to my WRMK Mini Alphabet Punch! It provides me with easy access to title making, and also covers a good area on my layout, making it prominent.


I must say, I am really a fan of fussy cutting. I added dimensions on the diamonds with smaller diamond/triangle pieces from the same pattern paper. As the word fussy suggests, cutting papers in rough fashion, so there is really no stress about it. Trust me, even if there was an over-cut in the paper, no one will notice! That is really the beauty of scrapbooking!

Another element I love to add are vellum. They are translucent, so they create a whole new detail without over emphasis. To adhere, simply use glossy accents where the glue dries clear so the glue stains will not be apparent.

Nowadays, we are also lucky to be able to use foil and glitter paper onto our layouts! That little bit goes a long way, and it helps to highlight the details on our layouts!

Finally to complete the layout, I added some clear and blue dew drops. They fill up the empty spaces without over cluttering - that's why they are my favorite! (And I really must add, MWL has just recently stocked many different colors of dew drops!)

Happy Father's Day to all the fathers out there! Hope you have enjoyed the walk through of this layout! You can learn more about stitching on layouts at Made With Love, we have a new workshop "Stitch and Sew" coming right up in July!

Materials used are available at Made With Love.
Made With Love
B2-08, 313 Somerset, Orchard Road
Tel : 67337630
Facebook |  Instagram

Supplies Used:
Pink Paislee - Paige Evans -
Pick Me Up Collection
WRMK Typecast
WRMK Mini Alphabet Punch
The Robin's Nest Dew Drops


MWL DT: LO | Sew Cute

Hello crafty friends! I am back on the blog as Made With Love DT, with a layout using the lovely WRMK products today!

I must say, the WRMK products have made my life much easier as a crafter. In this layout, I made use of 4 punch boards, Typecast and Stitch Happy.


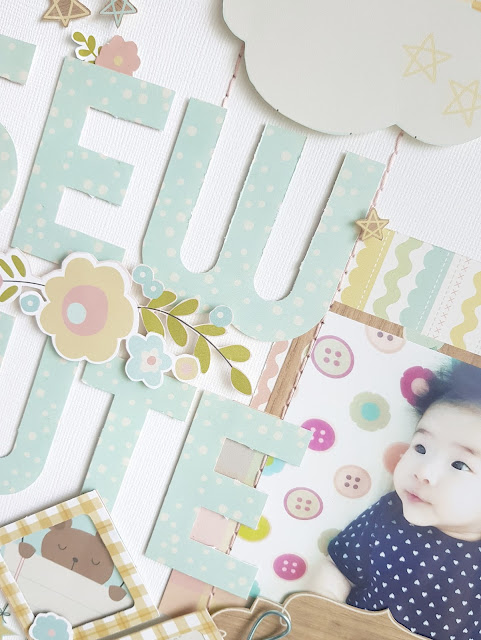
Isn't my niece cute! She is such a gem, and this is one of my favorite photo of her.


I started out with the WRMK tab punch board to create a tab. This tab piece helps to create an interesting matting to the photo. It also helps me create a link to add word sentiments! Here, I have used my (mint) typecast and typed out the word "precious".


Creating the title was easy with the WRMK mini alphabet punch board. All I had to do was to cut down pattern papers to size (1.5"x2.5") and then open up the Alphabet punch board app! 


This app made it very easy for me to get to the alphabets I needed to punch out!


Of course I had to use the sewing machine! Sewing is my favorite thing to do on a layout. It creates dimensions and a different texture on the layout. Mint is also my favorite color, I own both the typecast and sewing machine in mint. (Though I am also loving the sweet touch of pink!) For this layout, I did some straight stitches from the cloud to the tiles below, creating a visual of a baby's mobile on top of their cribs.


Here is the bottom of the "baby mobile". I cut 2 pieces of square pattern paper and slided them into the WRMK frame punch. I am using the 0.25" frame width on this layout. In one of the frames, I typed a little message to my niece using the WRMK typecast! Love to be able to customize a short message or journal on my layout!


Last but not least, my brand new toy! I recently got a new toy - WRMK happy jig! So many possibilities! I love that the happy jig is so easy to use! Included in the package is a booklet of ideas (and 3 colors of wires to get started with!) For additional inspirations, you can also look for @werhappyjig on instagram! 


For the word baby, I decided to give it a try to fix the pieces on my own. (The engineer in me just had to give it a try!) Viola! It was quite a smooth process! 

I found it easier to staple the wire words in place. Just 2 staples holding the start and end of the word, it works! 

Thank you for joining me today in my layout walk through. Hope you enjoyed it, and gotten insights of how you can make use of the WRMK tools. 

Materials used are available at Made With Love.
Made With Love
B2-08, 313 Somerset, Orchard Road
Tel : 67337630
Facebook |  Instagram

Supplies Used:
• WRMK Tab Punch Board
• WRMK Frame Punch Board
• WRMK Typecast
• WRMK Mini Alphbet Punch Board
• WRMK Stitch Happy
• Simple Stories "Oh, Baby" Collection


MWL DT: Workshop | Scrapbook Basics

Hi everyone! Today I am up as MWL DT member, sharing about one of our workshops - Scrapbook Basics. This workshop is very close to my heart. It is also what got me hooked to scrapbooking and documenting my daily life right now.

14 years ago, I was attracted to a beautiful shop named Made With Love. On my first visit, I remembered feeling lost, because I did not know what to buy nor how to get started. The projects on display were so pretty and I really hoped one day I could do something like that. So I took the first step to attend a workshop - Scrapbook Basics (previously known as Just Getting Started).

Yes, stepping into the workshop then was probably the best choice I ever made. That was the start of one project to another, and it led me to where I am now, teaching the very same workshop which got me started. I am a true believer of 2 things - foundations and practise. Foundations provide a base of information, and practise brings one to greater levels.


Scrapbook Basics covers 3 important sections to aid your journey into scrapbooking. 


Firstly, introduction of tools and essential scrapbooking terms. How did scrapbooking come about, and why we scrap? What is the difference between a scrapbooking shop and a stationery shop? What do we need to start making a layout? In this first section of the workshop, we will cover the necessary terms and items to get started.


Next, how do we get started with a layout? What makes a layout? What styles bring out the photograph? How to highlight the story you want to tell? In the second portion of the class, we discuss composition guidelines, and how to get started on a 12" x 12" page. 


Last but not least, the workshop isn't complete until you give it a try! Nothing beats having to try out what you have learnt, and the hands on practise will allow you to understand the theory learnt.


At Made With Love, we prepare you for what comes next. Be it scrapbooking layouts, mixed media work, altered art or album making, this first step will help you embrace your next part of the creative journey. 

Scrapbook Basics Workshop costs $45 for 2.5 hours of informative and fun experience! Products and supplies are provided for this workshop, just bring along 2-3 4R photos.

Check out the workshop samples which are on display in the store!
Made With Love is located at
B2-08, 313 Somerset, Orchard Road
Tel : 67337630
Facebook |  Instagram


Thanks for joining me today and have a great CNY week ahead! 


MR DT: LO | Lucky

Hello roadies! I am Stacy and back on the Mayaroad blog with a layout to share. This month at Mayaroad, we are celebrating the love for twine.
As most of you already know, this is my staple product so I am very excited to share this layout today!

The first thing which inspired me was to crochet a flower for my layout. Any stitching work inspires me for layouts, be it crochet or stitching patterns. In this case, I made 2 flowers with a crochet hook and the jute cording twine. Then, I added some pearl buttons as flower centers to complete the flower. 
The pearl buttons comes in different sizes and patterns. I love them all! So I decided to add in some of the smaller ones as well. They fill in the empty spaces and gives a glamour to the page. Beneath the layers, I have also added some jute that hangs my layers and photo.
The photo and layers are clipped onto the jue string by the bulldog clips. Easy way to add a decor piece onto the layout.
Don't forget to finish up the layout with the wood hexagons! These are another must have - I am addicted to using these little ones!
Hope you get inspired to use up those Mayaroad twines you have in your possession and add a few more to your collection! There is so much more reason to do so when there is a 30% off for all twine purchases using the code "TWINETIME". Check out the twine collection here.
Have a great week ahead!

MR DT| LO: Collect Moments

Hi Roadies, it is Stacy here on Maya Road with a new layout to share. Working with kraft has always been my favorite. The neutral colors make it easy to work with and it pleases my eye while I am crafting. 
Today I am focusing on Kraft and pockets.
LO | Collect Moments
The word "collect" really says it all. In this layout, I have hidden a few photos and journaling which I wanted to collect. Sometimes, I just like to collect some of the memories and relate them on a layout. They can be photos which I have scrapped before, because those are the photos which I remembered at a different point of time. Sometimes, it is fun to document memories at different stages. 
Behind the photo, I added the kraft landscape envelope so I can pocket another 2 photos. The photos are added on the shipping tag. Shipping tags are really useful in making layouts. Change the color to match your layout. In this case, I have simply used distress inks to alter it into an older tag look. 
Inside the same envelope, I added another smaller envelope. This helps me keep the other tag in place, where I can freely add some hidden journalling. I used my good old typewriter directly on the tag. You could also write or print from the computer.
Loving the frame sayings and the vintage just my type pieces. These are so versatile, I keep adding them to my pages. Another new fun piece that you totally need - the love kraft gift tag. I love the positive and the negative portion. Here I used the positive "Love".
Yes, here comes the negative portion. The scalloped top of the tag is so beautiful, it adds a flair when placed behind embellishments like the kraft picture perfect camera! I also like to add some jute cording, tucked between the papers and embellishments. That really gives a dimension to the layout.
To complete the entire look, a little set of embellishment filling up the top left of my layout. Don't forget the scroll frames - these are perfect for journaling or layering. I used this as the base of my sentiment to help highlight it. With flowers there must be butterflies! I picked a few of my kraft butterflies and added them randomly across the page so it seems like they are fluttering around.
Kraft embellishments are certainly basics for me! I used a bunch of Maya Road kraft products on my layout today and we have a special on the website, 30% off for the month of September using coupon code KRAFTY. If you see something you like, grab it while it's on sale!  You can find all the Kraft products HERE.
Hope you find inspiration in the layout today. Thanks for stopping by the blog and have a great weekend!