Showing posts with label book binding. Show all posts

MR DT: BOOK | Merry

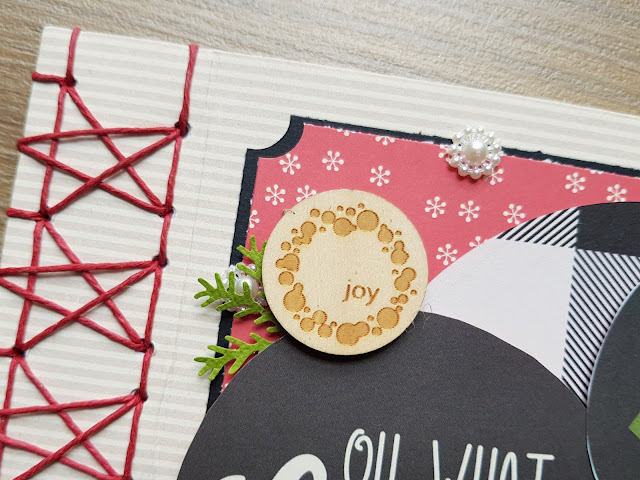
Hello crafty friends! I am on the Maya Road blog sharing a christmas gift - stary stab binding album! 

I love giving handmade books for Christmas, and the star stab binding is one of my favorite binding methods!


Star stab binding is a fun and easy way of book binding. Add some fun Maya Road embellishments / diecuts and viola!


Stitching is easy when you have the right thread! I enjoy using Maya Road KO waxed hemp (peony). It allows me to keep an adequate amount of tension on the stitches, and a good thickness so the overall stitching is prominent and sturdy! 


For the front cover, I decorated it with some Christmas papers and added MR Wood Holiday Tokens. These tokens goes hand in hand with any projects!

Another embellishment I love to use is the MR pearl flower trim. It fills up empty spaces and is a pretty sight!


Diecuts are super useful as well. Here, I have used the Merry Christmas die and pasted the word merry on a black cardstock. I did a fussy cut around the word so it gives a border to emphasize on the title.

Another trick to highlight the title, add some clusters of MR KO Jute string. It works wonders!


Hope you have enjoyed the walk through today! 

Maya Road Supplies Used:

MWL DT: Mini Album | Scrappy Friends (Long Stitch + Twist)

It is my turn up as Made With Love DT sharing a mini album I've hand stitched recently! I am super excited to share this album which features a twisted long stitch binding!


I was inspired by the Kaisercraft 6.5" paper pad #Me collection sitting on my desk, and I love the colors. There were some interesting quotes in the paper pad as well. It is really easy to get started on making a 6" album with a paper pad collection. There is enough pattern papers for the inserts, and some embellishments which are perforated and you could just pop it out from the pack. 


On the front cover, I decided to add the Maya Road wooden mason jar and transparency clock. It is simple to come up with the album cover once you have the main elements decided. Another trick is adding strands of MR jute craft strings behind embellishments or flowers. They act as fillers in this case, fills up some empty spaces and create layers without being overwhelming. Sequins are also simple elements that really cook a storm. Add one or two randomly across the cover, and you get a subtle shine to the page.


There are many ways to construct the album. Each of the methods has its uniqueness, and in this case, I used some fabric to help construct this album spine. The contrast of fabric (on the spine) and patterned paper (on the covers) creates a unique look.


What is an album without stitching? For me, albums with hand stitching complete the look, and add a classy definition. Book binding makes a handmade album extra special! This time, I am adding some die-cut alphabets to my album spine. Like what you see? Want to learn how I did the stitching? Stay tuned to MWL's facebook page for the upcoming workshop in October! *Wink*


Here are some closeups of the album. Add some stickers or die-cuts in the pages - decorating the pages are super fun!

Supplies Used:

  • Kaisercraft 6.5" Paper Pad - #Me
  • Kaisercraft Sticker Sheet - Close Up!
  • Kaisercraft Sticker Sheet - Ooh La La!
  • WRMK Sequin Stickers, black
  • Maya Road jute craft string
  • Maya Road wooden mason jar
  • Maya Road transparency clock, white 

All supplies used are available at Made With Love. Hope you find inspiration from the post today and thank you for dropping by my blog today! 


MR DT: Mini Album | December Christmas

Hello! This week, our designers on Maya Road blog are pairing with Photoplay to share some inspirations! 


I was very excited and inspired when I received the gorgeous Mad 4 Plaid Christmas collection from Photoplay. I knew I had to get ready for the upcoming Christmas (it is just 4 months away!) 

Therefore I started with a mini album, which opens up to a Starburst effect. One of my favorite is the homemade holidays stamp set. I used it to emboss some snowflakes onto the pattern paper. Other embellishments include the merry christmas diecutFanciful Wish diecutSilver Snow Crystal Charms and Crystal Circle Buttons.


On the inside of the album, I decorated it with red Rick Rack trims, and Christmas die cuts. Here I used the merry christmas steel die.


The album can be opened up fully displaying a starburst effect. I used the gold bulldog clips to secure the ends. Just to add some flair, I have also added the Vintage Crafting Tassels - Fire Red and snowflake charm, held by the mini safety pins.


But I got carried away and made another 2 more albums! I made these slightly smaller than each other.


Each of these mini albums are binded with coptic stitch using Ken Oliver waxed hemp threads.


The albums fan open to a star shaped manner.


Now with these 3 albums I am ready to build my very own Christmas tree! I intend to place a photo each day as I start the countdown towards Christmas, I think it would be fun! 


Hope you are enjoying the inspiration so far. 

To celebrate this blog hop, we are excited to be giving away a $20 coupon to the Maya Road online store! One winner for the prizes will be chosen from entries on all of the blog posts here on the Maya Road Blog about the swap. Winner will be announced here on the blog next week. So stop by and comment each day for a chance to win! Be sure to also stop by Photoplay and social media for lots of inspiration as well! (Be sure to first check out here and you can hop from there on.) 

This same month, use code KOlove to enjoy 30% off Ken Oliver Charms too!


This month is surely a fun filled month, thanks for checking out the blog today. Don't forget to drop by Maya Road blog tomorrow again! 


MR DT: Single Coptic Notebook

Hello! It has been a while and I had been busy stitching!

Today, I am on the Maya Road blog sharing a hand stitched notebook today! I will never get tired of stitching notebooks, they are special with different stitching patterns and a useful gift for the recipient!


There are many chipboard albums from the Maya Road collection which I dismantle to make my notebooks. They come with tabs, which makes the notebook very different from what you can get with regular rectangular chipboards. I intend to use this notebook to document my travels, hence the travel token come in handy on the front cover. I like to keep the front cover of the notebook as flat as possible, so as not to hinder when I write.


With the same thought in mind, I hang some charms on the tabs of the front cover with the help of a bulldog clip and a mini safety pin. I like dangling charms - they are always pretty on albums or notebooks! The bulldog clips allow me to hang these beautiful charms and removing it when I need to.


Charms are very useful in every project! They are good as decor, either pasted as an embellishment or hung for decorations. Here, I am using the single coptic stitch for this notebook. The KO Waxed Hemp is perfect for this stitching! It gives me the perfect tension, and a good visual for the coptic loops. The waxed hemp is also strong enough to support the weight of charms dangling from the spine.


Maya Road is also having a promo in July - Charms! Get your supply of charms at 30% off now!
Thanks for joining me through this post and dropping by the blog today~

Supplies Used:

Maya Road & Xyron Blog Swap | Mini Album - Enjoy

It is Maya Road and Xyron blog swap this week, and all week long, our Design team members have been sharing great inspirations! 

Today is Day 4 and it is my turn to share my mini album for the blog swap - Enjoy.


Creating mini albums are a wheeze with the right tools and embellishments. I like to categorize my work into several parts so making albums take lesser time for me. In fact, this album took me 3 hours from start to finish. The xyron creative station lite has given this project a big time booster! 


First I usually gather the necessary supplies for my album. I am using a selection of Maya Road dies as the base in this album. You can find my list of supplies at the end of this blog post. The dies from Maya Road can cut a variety of materials, I commonly use pattern paper and foam. After die-cutting, I collect the die cuts in a tray.


The second step is the secret of what makes the making of the album a whole load faster! I place all the elements through the Xyron Creative Station Lite and viola! What I like is the ease of use, just roll all the pieces through and you are all prepared to stick the elements into your album! You could even run your ribbons / laces through this unit. It saves you from the hassle of using liquid glue and getting a big mess onto your projects. Yes, do that for your photographs too! What I love about it is the full coverage of the stickiness, therefore ensuring that your photos or papers would stick permanently and not fall off over time.


The next part is really getting the album together. I used the xyron station to make the cover of the album as well. Then, I wanted to add some interest to the spine, so I used the MR Jute and Twine Cording to perform some stitching. The album cover is first done by adding the MR lace, clock transparencies and kraft bracket tag. Later, I added the MR coffee wood token, resin diamond (coming soon!), wood slices, pearl ribbon and felt flower.

Speaking of flower, did you know that Maya Road is also having a special deal on flowers this month? Check this out!


Here are some close ups of the album using my favourite dies from Maya Road! It is easy to adhere the smaller pieces when you have the Xyron, you just need a pair of tweezers to help pick up the finer pieces and then place them onto your work. 


Thank you for joining me today and don't forget to leave a comment at the Maya Road blog for a chance to win some fabulous prize! Blog swap details can be found here.


Maya Road Supplies Used: