Showing posts with label design team. Show all posts

MR DT: Album | Joy

Hello! End of the year means joy to me as I start to prepare some gifts for my dearest family and friends! This is also the time I start humming Christmas Carols while I work on my projects ha!
Today I am up on Mayaroad, and would like to share a mini album of Joy, having a dear friend in mind. She has kept almost every vintage Christmas postcards and photographs, a collection she loves dearly. I thought it would be nice to make an album for her.


This album is covered with leather, then hand bounded together with secret belgium binding. This mode of binding is my favorite, because it can look vintage or fun loving depending on the thread you use. This time, I am using the jute craft string as the main element in this project. Gotta love this roll of jute craft string, I have to add some of these to almost all my projects!


The main focus on the album cover was the jewel center burlap blossom. I really liked this flower piece, it is grunge and elegant all at the same time! The only difference was that I used a plier to remove the jewel centre, so I could use them seperately as a splatter around my centerpiece.


I have used the KO vintage trims on this album. Since it was too white to my liking, I decided to add some coffee stains to it. It is really easy, just add coffee powder (no instant coffee mix, just plain grinded coffee beans) to water. Soak the trim until the color appeals to you.


I added the trims to the background in rows of different lengths, and also to the center of the burlap blossom. Just run a running stitch at the straight ends of the trim, and then tighten to form a rosette trim. To top it up, I added a snowflake metal charm. To add a title to the album, I started out with distressing on the remains of the shipping tags I had used previously. Then I stamped the word Joy and happy days with silver ink pad. These words are from the Homemade Holidays stamp set. Just for fun, I added a scroll tied together with the jute craft string and accompanied by the gold star pins.


For the pages I kept it simple yet with a little fun! These pull out tags creates interest for the receiver. I used the Manila shipping tags as a base, distressed with shades of brown for contrast. You can use these tags too! On a few pieces, I stamped the snowflakes  from the Homemade Holidays stamp set randomly on the tag. I have also added some jute craft strings here and there, and at the top of the shipping tag.


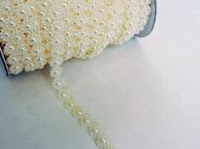
When slided, the shipping tag raises and disclose the photo that is behind it. I like this element of surprise for the receiver! At the base of the shipping tag, I have also added the coffee dyed trim and a row of the pearl center trim.


Here is how the slider mechanism looks like!

Hope you get inspired for Christmas projects with Mayaroad products!


Visit Mayaroad for more inspirations!


MR DT: LO | Lucky

Hello roadies! I am Stacy and back on the Mayaroad blog with a layout to share. This month at Mayaroad, we are celebrating the love for twine.
As most of you already know, this is my staple product so I am very excited to share this layout today!

The first thing which inspired me was to crochet a flower for my layout. Any stitching work inspires me for layouts, be it crochet or stitching patterns. In this case, I made 2 flowers with a crochet hook and the jute cording twine. Then, I added some pearl buttons as flower centers to complete the flower. 
The pearl buttons comes in different sizes and patterns. I love them all! So I decided to add in some of the smaller ones as well. They fill in the empty spaces and gives a glamour to the page. Beneath the layers, I have also added some jute that hangs my layers and photo.
The photo and layers are clipped onto the jue string by the bulldog clips. Easy way to add a decor piece onto the layout.
Don't forget to finish up the layout with the wood hexagons! These are another must have - I am addicted to using these little ones!
Hope you get inspired to use up those Mayaroad twines you have in your possession and add a few more to your collection! There is so much more reason to do so when there is a 30% off for all twine purchases using the code "TWINETIME". Check out the twine collection here.
Have a great week ahead!

MR DT| LO: Collect Moments

Hi Roadies, it is Stacy here on Maya Road with a new layout to share. Working with kraft has always been my favorite. The neutral colors make it easy to work with and it pleases my eye while I am crafting. 
Today I am focusing on Kraft and pockets.
LO | Collect Moments
The word "collect" really says it all. In this layout, I have hidden a few photos and journaling which I wanted to collect. Sometimes, I just like to collect some of the memories and relate them on a layout. They can be photos which I have scrapped before, because those are the photos which I remembered at a different point of time. Sometimes, it is fun to document memories at different stages. 
Behind the photo, I added the kraft landscape envelope so I can pocket another 2 photos. The photos are added on the shipping tag. Shipping tags are really useful in making layouts. Change the color to match your layout. In this case, I have simply used distress inks to alter it into an older tag look. 
Inside the same envelope, I added another smaller envelope. This helps me keep the other tag in place, where I can freely add some hidden journalling. I used my good old typewriter directly on the tag. You could also write or print from the computer.
Loving the frame sayings and the vintage just my type pieces. These are so versatile, I keep adding them to my pages. Another new fun piece that you totally need - the love kraft gift tag. I love the positive and the negative portion. Here I used the positive "Love".
Yes, here comes the negative portion. The scalloped top of the tag is so beautiful, it adds a flair when placed behind embellishments like the kraft picture perfect camera! I also like to add some jute cording, tucked between the papers and embellishments. That really gives a dimension to the layout.
To complete the entire look, a little set of embellishment filling up the top left of my layout. Don't forget the scroll frames - these are perfect for journaling or layering. I used this as the base of my sentiment to help highlight it. With flowers there must be butterflies! I picked a few of my kraft butterflies and added them randomly across the page so it seems like they are fluttering around.
Kraft embellishments are certainly basics for me! I used a bunch of Maya Road kraft products on my layout today and we have a special on the website, 30% off for the month of September using coupon code KRAFTY. If you see something you like, grab it while it's on sale!  You can find all the Kraft products HERE.
Hope you find inspiration in the layout today. Thanks for stopping by the blog and have a great weekend! 

MR DT: Mini Album | December Christmas

Hello! This week, our designers on Maya Road blog are pairing with Photoplay to share some inspirations! 


I was very excited and inspired when I received the gorgeous Mad 4 Plaid Christmas collection from Photoplay. I knew I had to get ready for the upcoming Christmas (it is just 4 months away!) 

Therefore I started with a mini album, which opens up to a Starburst effect. One of my favorite is the homemade holidays stamp set. I used it to emboss some snowflakes onto the pattern paper. Other embellishments include the merry christmas diecutFanciful Wish diecutSilver Snow Crystal Charms and Crystal Circle Buttons.


On the inside of the album, I decorated it with red Rick Rack trims, and Christmas die cuts. Here I used the merry christmas steel die.


The album can be opened up fully displaying a starburst effect. I used the gold bulldog clips to secure the ends. Just to add some flair, I have also added the Vintage Crafting Tassels - Fire Red and snowflake charm, held by the mini safety pins.


But I got carried away and made another 2 more albums! I made these slightly smaller than each other.


Each of these mini albums are binded with coptic stitch using Ken Oliver waxed hemp threads.


The albums fan open to a star shaped manner.


Now with these 3 albums I am ready to build my very own Christmas tree! I intend to place a photo each day as I start the countdown towards Christmas, I think it would be fun! 


Hope you are enjoying the inspiration so far. 

To celebrate this blog hop, we are excited to be giving away a $20 coupon to the Maya Road online store! One winner for the prizes will be chosen from entries on all of the blog posts here on the Maya Road Blog about the swap. Winner will be announced here on the blog next week. So stop by and comment each day for a chance to win! Be sure to also stop by Photoplay and social media for lots of inspiration as well! (Be sure to first check out here and you can hop from there on.) 

This same month, use code KOlove to enjoy 30% off Ken Oliver Charms too!


This month is surely a fun filled month, thanks for checking out the blog today. Don't forget to drop by Maya Road blog tomorrow again! 


MWL DT: LO | You are Here

Hello! Wheee, time is passing by fast, and school holidays are over. It is the start of July, second half of 2017 already! How has the school holidays been for everyone? Perhaps you have that vacation photo at a beach resort or some outdoor fun? Time to document those pretty photos!

Today I am sharing a stitched layout on Made With Love design team! I am inspired by the Summer Days Collection by Simple Stories, this collection brings me much joy! I am always a sunshine kind of girl, so this collection is really perfect for my outdoor shoots!


When I do my layouts, I really love to add a flair of stitching to the layout. No matter how simple the stitch is, it always brings a good texture. I always find that the stitches make the layout look complete. In this layout, I first did some die-cutting with the Sizzix Framelits Die Set - Dotted Squares. Basic dies like these are important, they make the crafting work much easier. Then, using the Maya Road waxed Hemp (Lemon Yellow and Tangerine), I did some blanket stitches around the perimeter of the die-cuts. 


Another element I love using are wood tokens. These are the Maya Road wood tokens which you can find an array in Made With Love. For the ring wood tokens, I corded the waxed hemp through on both ends. That little loop around the ring wood tokens looks like little hearts on either sides extending out. Little details like these brings a smile!


In addition to wood tokens, acrylic tokens are also another embellishment I used on this layout. Subtle, but it gives a good texture and gives a highlight to other embellishments.


The materials used for this project are available at Made With Love. Hope you like the walk through and perhaps try your hand with stitching on layouts! It is addictive and therapeutic!

Don't forget to also look out for more book binding projects / classes available only with Made With Love. You can also use book binding stitches on layouts! 

Thank you for dropping by my blog today!